
Introduction
Managing the queue on Spotify is an essential skill for any avid music listener. Whether you’re creating a playlist for a party or curating a personalized collection of your favorite songs, it’s important to have control over what plays next.
In this article, we will guide you through the process of clearing the queue on Spotify, both on mobile and desktop platforms. But before we get into the nitty-gritty details, let’s first understand why it’s important to manage your Spotify queue effectively.
Importance of Managing the Queue on Spotify
The queue feature allows you to line up songs for continuous playback, ensuring an uninterrupted listening experience. However, as your music taste evolves and your mood changes, it’s crucial to regularly clear the queue to keep it fresh and tailored to your preferences.
By managing your queue effectively, you can:
- Avoid repetitive songs: Clearing the queue ensures that you don’t get stuck in a loop of hearing the same tracks over and over again.
- Adapt to different contexts: Cleaning out the queue allows you to adjust the song selection based on different situations or settings.
- Discover new music: By regularly refreshing your queue, you open up opportunities to explore new artists and genres.
Now that we’ve established why managing your Spotify queue is important, let’s move on to understanding how to clear the queue on both mobile and desktop platforms.
Overview of the Process to Clear the Queue on Spotify
The process of clearing the queue slightly varies between mobile and desktop platforms. On mobile, you can open the current song in full screen and tap the queue button. From there, you can select “Clear Queue” to remove all songs from the list. On desktop, simply click the queue button and then click “Clear Queue” to achieve the same result.
In addition to clearing the entire queue, Spotify also allows users to remove individual songs from the queue by tapping or clicking on them and selecting “Remove.” This gives you even more control over your listening experience.
Now that we’ve established why managing your Spotify queue is important and provided an overview of how to clear it, let’s dive into each platform’s specific steps in more detail. First, let’s explore how to clear the queue on Spotify mobile.
Clearing the Queue on Spotify Mobile
Spotify offers a seamless experience for managing your queue, whether you’re on the go or enjoying music at home. Clearing the queue on Spotify mobile is a straightforward process that allows you to maintain control over your listening experience. Here’s how to clear your queue and keep your music selection fresh.
1. Open the Current Song in Full Screen
When you’re listening to a song on Spotify mobile, you can easily access the queue by opening the current song in full screen. This method provides a convenient way to view and manage the upcoming tracks in your queue without interrupting your listening experience.
To open the current song in full screen:
- Tap on the song that is currently playing to expand it to full screen.
- This action will give you access to the queue button and other options for managing your queue effectively.
By utilizing this method, you can efficiently navigate to the queue section and take necessary actions to clear or modify the upcoming songs in your queue.
2. Tap the Queue Button
The queue button is located in a convenient spot for easy access to your Spotify queue on mobile.
To clear the queue on Spotify mobile, you can easily tap the queue button to manage the songs lined up for playback. This button is strategically placed within the Spotify interface, allowing for quick and effortless navigation to your current queue of songs.
When you tap the queue button, it opens up a window displaying the songs in your queue, enabling you to take further actions such as rearranging, removing, or clearing the queue altogether. This intuitive design ensures that you have full control over your listening experience on the mobile platform.
3. Select “Clear Queue”
When it comes to clearing the queue on Spotify mobile, there is a straightforward process to follow. Here’s a step-by-step guide to help you clear your queue efficiently:
- Open the current song in full screen by tapping on the album art or the song title at the bottom of the screen. This will bring up the full-screen player.
- Next, tap on the queue button located at the bottom-right corner of the screen. It looks like three horizontal lines with dots in them. Tapping this button will open up the queue menu.
- In the queue menu, you will see an option that says “Clear Queue.” Simply select this option to clear your entire queue and start fresh.
By selecting “Clear Queue,” all the songs currently in your queue will be removed, allowing you to create a new playlist or add different songs to your queue. It’s a great way to quickly clear out any unwanted tracks and start anew.
Remember, clearing your queue can be done anytime and as often as you’d like. It gives you the freedom to curate your listening experience based on your mood or preferences at any given moment.
Clearing the Queue on Spotify Desktop
To clear the queue on Spotify desktop, follow these steps:
1. Click the Queue Button
- Talking Point: You can find the queue button at the bottom-right corner of the Spotify window, represented by three horizontal lines.
- After opening Spotify on your desktop, locate the queue button at the bottom-right corner of the window. It is represented by three horizontal lines stacked on top of each other.
- By clicking on this queue button, you will be able to access and manage your current queue easily.
“The queue button is a convenient way to navigate your current song list.”
Now that you have accessed the queue, let’s move on to the next step.
Remember, it’s important to note that individual songs in the queue can also be removed by clicking on them and selecting “Remove” or “REMOVE” at the bottom-left of the screen. This allows you to customize your listening experience further.
2. Clearing Your Queue
From the options that appear, you can see the “Clear Queue” button, which allows you to remove all the songs in the queue with a single click.
When you click on the “Clear Queue” option, Spotify will prompt you to confirm whether you want to clear the entire queue. Once confirmed, all the songs in your queue will be removed, leaving it empty and ready for new additions.
This straightforward process enables you to efficiently manage your Spotify queue on the desktop platform. Whether you want to start afresh or reorganize your listening queue, clearing the queue provides a clean slate for curating your music experience.
Managing Your Queue on Spotify
1. How to Save the Spotify Queue as a Playlist
Talking Point: Another way to save your favorite queue is by creating a playlist so you can access it anytime.
When you find yourself enjoying a particular sequence of songs in your queue, you may want to save it for future listening. Fortunately, Spotify allows you to save your existing queue as a playlist with just a few simple steps.
- Adding songs to the queue: Before you can save the queue as a playlist, make sure it contains all the songs you want to include in the playlist.
- You can add songs to the queue by browsing through albums, playlists, or searching for specific tracks and tapping or clicking “Add to Queue.”
- Tapping/Clicking the Queue Button: Next, navigate to the current song playing and tap or click the queue button to view the entire list of queued songs.
- Selecting the Three Dots Menu: Once in the queue view, tap or click on the three dots menu next to the song that is currently playing or any other song in the queue.
- Entering a Playlist Name, Tapping “Save Queue”: From the options that appear, select “Save to Your Library” and then choose “Create Playlist.” Enter a name for your new playlist and tap or click “Create” or “Save” to store your queue as a playlist.
By taking these simple steps, you can easily preserve your favorite queues as playlists for future enjoyment. This feature is especially useful when you come across an arrangement of songs that perfectly suits your mood or a specific occasion.
2. Removing Songs from Spotify Queue
Talking Point: The process for removing individual songs from your Spotify queue is quick and straightforward.
If you find that certain songs no longer fit the vibe or if you simply want to rearrange your listening experience, you can easily remove them from your Spotify queue.
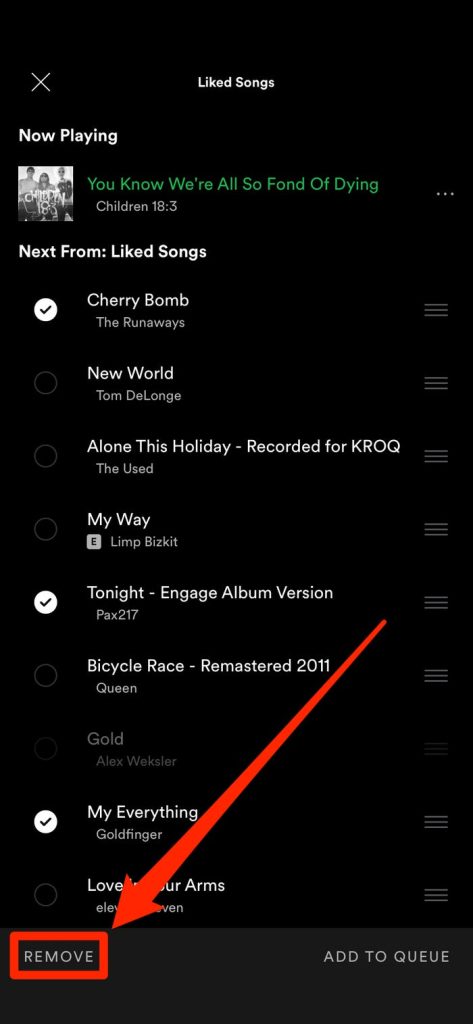
On both mobile and desktop platforms, individual songs can be removed from the queue by tapping or clicking on them and selecting “Remove” or “REMOVE” at the bottom-left of the screen. This allows for easy customization and adjustment of your queue based on your preferences at any given time.
Overall, these features provide users with greater control over their listening experience, allowing them to curate their queues and playlists according to their unique tastes and moods without any hassle.
2. Adding songs to the queue
To create a playlist, you must first add songs to the queue:
- Browse through Spotify and find a song you want to add to the queue.
- Click on the three dots next to the track.
- From the options that appear, select “Add to Queue.”
- The added song will now appear in your queue.
- Continue adding more songs in a similar manner.
By following these steps, you can curate your listening experience by queuing up your favorite tracks for uninterrupted playback.

3. Tapping/Clicking the Queue Button
Talking Point: The process for removing songs from the Spotify queue is straightforward and can be done with a few simple steps.
When managing your Spotify queue, you may want to remove certain songs to create a more tailored listening experience. Here are the steps to remove individual songs from the queue:
1. Mobile:
- Tap on the song that you want to remove from the queue.
- Select “Remove” or “REMOVE” at the bottom-left of the screen.
- The song will be removed from the queue instantly.
2. Desktop:
- Click on the song in the queue that you wish to remove.
- Select “Remove” or “REMOVE” at the bottom-left of the screen.
- The selected song will be taken out of the queue.
By following these simple instructions, you can easily tailor your Spotify queue to your preferences, ensuring a seamless and enjoyable listening experience.
4. Selecting the Three Dots Menu
When managing your Spotify queue, you have the option to save it as a playlist for future listening. This allows you to easily access and enjoy your favorite songs in a curated collection.
To save your Spotify queue as a playlist, follow these steps:
1. Tapping/Clicking the Queue Button
First, open the current song in full screen and tap or click on the queue button. This will display the list of songs in your queue.
2. Selecting the Three Dots Menu
Once you have accessed the queue, look for the three dots menu located next to each song in the list. This menu icon signifies additional options for that particular song.
3. Choosing “Save to Your Library”
When you click on the three dots menu for a song in your queue, a dropdown menu will appear. In this menu, select “Save to Your Library” to add the song to your personal collection.
4. Naming Your Playlist
After saving individual songs from your queue, navigate to your playlists section within Spotify. Here, click on “Create Playlist” to start a new playlist.
5. Adding Songs from Your Queue
In the process of creating a new playlist, you will have the option to add songs from your queue. Simply search for and select the songs you want to include in your playlist.
6. Completing and Saving Your Playlist
Once you have added all the desired songs from your queue, enter a name for your playlist and click on “Save” or “Create.” Your Spotify queue is now saved as a playlist!
By saving your queue as a playlist, you can easily revisit those songs later without having to recreate the entire sequence. It’s a convenient way to organize and enjoy your favorite tracks on Spotify at any time.
Remember that removing individual songs from your queue is also possible by tapping or clicking on them and selecting the “Remove” or “REMOVE” option. This allows you to fine-tune your queue and customize your listening experience.
Now that you know how to save your Spotify queue as a playlist and remove songs from your queue, you can fully take advantage of this feature to curate and enjoy personalized music collections. Happy listening!
5. How to Save Your Spotify Queue as a Playlist
To save your Spotify queue as a playlist, follow these steps:
- After adding songs to your queue, tap or click the queue button. This will display the current queue on your screen.
- In the queue menu, select the three dots menu located at the top-right corner of the screen. This will open a drop-down menu with various options.
- From the drop-down menu, select the option that says “Save Queue.” This will prompt a new window to appear, allowing you to customize your playlist.
- Enter a name for your playlist in the designated field. You can be as creative as you want with the name to reflect the mood or theme of the songs in your queue.
- Once you have entered a playlist name, tap or click the “Save” button. This will save your Spotify queue as a playlist under the name you specified.
By saving your queue as a playlist, you can easily access and listen to those songs at any time without having to recreate the queue from scratch. It’s a convenient way to keep track of your favorite songs or create themed playlists for different occasions.
Remember that saving the queue as a playlist does not remove the songs from your library or any other playlists they may already be a part of. It simply creates a separate playlist containing the songs currently in your queue.
So go ahead and personalize your playlists by saving your Spotify queue as a playlist today!
Conclusion
To make the most out of your Spotify experience, remember to:
- Regularly manage your Spotify queues to keep them fresh and tailored to your mood.
- Organize songs into different playlists based on genres, moods, or activities instead of relying solely on the queue feature.
By taking these simple steps, you can ensure that your music library is always ready to deliver the perfect soundtrack for any moment. So go ahead, hit play, and let the music take you away!
